15 Aug 2023
•
flutter
Solved - Generating PKCE Code Verifier and Code Challenger in flutter/dart
PKCE
PKCE, or Proof Key for Code Exchange, is an extension to the OAuth 2.0 authorization framework that enhances the security of authorization code-based flows, particularly those used by native and mobile applications. The primary purpose of PKCE is to mitigate certain security vulnerabilities that can arise during the authorization process.
In simple terms, the code verifier and code challenge are like a secret code that mobile and native apps use to securely ask for permission, while the client secret is like a password that web applications use to identify themselves to a server. The key difference is that the code verifier and code challenge are designed for situations where apps might not be as secure as web servers.
Code Verifier: Since the code verifier is generated locally and is used only once, it's more difficult for attackers to predict or intercept it.
Code Challenge: The challenge, even if intercepted, should be useless to attackers without knowledge of the original code verifier. The transformation makes it harder to reverse-engineer the verifier from the challenge.
PKCE in flutter apps - Generating Code verifier and code challenge - Simple function
import 'dart:convert';
import 'package:crypto/crypto.dart';

void main() {
  final codePair = generateCodeVerifierAndChallenge();
  print('Code Verifier: ${codePair.codeVerifier}');
  print('Code Challenge: ${codePair.codeChallenge}');
}

class PKCECodePair {
  final String codeVerifier;
  final String codeChallenge;

  PKCECodePair({required this.codeVerifier, required this.codeChallenge});
}

PKCECodePair generateCodeVerifierAndChallenge() {
  // Generate a random code verifier
  final verifierBytes = List<int>.generate(64, (i) => i);
  final codeVerifier = base64UrlEncode(verifierBytes);

  // Calculate the code challenge
  final challengeBytes = sha256.convert(utf8.encode(codeVerifier)).bytes;
  final codeChallenge = base64UrlEncode(challengeBytes);

  return PKCECodePair(codeVerifier: codeVerifier, codeChallenge: codeChallenge);
}
30 Nov 2022
•
flutter
Designing Flutter App Architecture using BLoC and Repository pattern
Creating a well-structured architecture is crucial for building scalable, maintainable, and efficient Flutter applications. In this blog post, we will explore various architectural approaches that you can adopt for your Flutter app development projects and in detail we will look into BLoC with Repository pattern. Each architecture has its strengths and is suitable for different types of applications, so let’s dive in and examine your options.
1) MVVM (Model-View-ViewModel)
Overview: MVVM is an evolution of MVC. It introduces a ViewModel, which acts as an intermediary between the View and the Model. It’s particularly useful when dealing with complex UI logic.
Pros:
- Improved separation of concerns compared to MVC.
- More maintainable and testable code.
- Better support for data binding and reactive UI updates.
Cons:
- Can be overkill for simple apps.
- Learning curve for those new to reactive programming and ViewModel concepts.
- Might require additional packages or libraries for full MVVM implementation.
2) Bloc (Business Logic Component)
Overview: Bloc is a Flutter-specific architecture pattern that focuses on managing the flow of data and events in your app. It uses streams and sinks for reactive programming, making it highly suitable for handling state.
Pros:
- Excellent for managing complex state.
- Separation of UI and business logic.
- A strong community with available packages (e.g., the flutter_bloc library).
Cons:
- Learning curve for those new to reactive programming.
- Can be verbose in some cases.
- May not be necessary for simpler applications.
3) Provider
Overview: This is a state management library that can be used with any architectural pattern. Provider makes it easy to share data between widgets and to manage the state of the app.
Pros:
- Easy to learn and use.
- Flexible and can be used with any architectural pattern.
- Supports lazy loading of data.
- Reduces boilerplate code.
- Devtool friendly.
- Improves scalability.
- Makes InheritedWidgets easier to use.
Cons:
- May accidentally call unnecessary updates.
- Not as efficient as some other state management solutions.
- Can be difficult to debug complex state changes.
I did not consider riverpod as it was migrating to a newer version, at the time of writing
Understanding the BLoC Pattern
Reference: https://pub.dev/packages/flutter_bloc
The BLoC pattern separates your app’s UI components from the business logic and state management. BLoC stands for Business Logic Component, and it employs reactive programming principles, using streams and sinks to manage data and events. BLoC is particularly well-suited for handling complex state management requirements in Flutter apps.
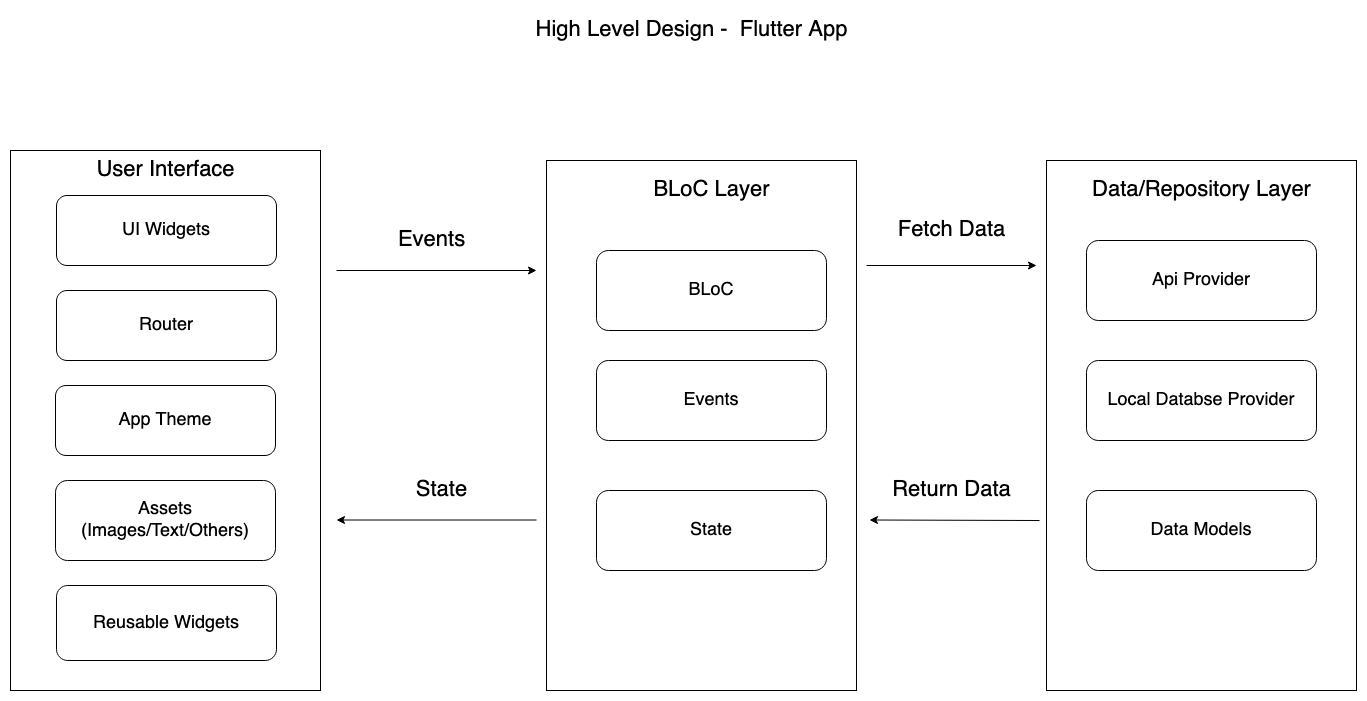
Key Components of BLoC
- Bloc: Represents the business logic unit, managing state changes and data flows.
- Events: Trigger actions that lead to state changes.
- States: Represent different states of your application and are emitted by the BLoC in response to events.
- Streams and Sinks: Used for handling asynchronous data flows.
Implementing the Injectable Repository Pattern
Highlights:
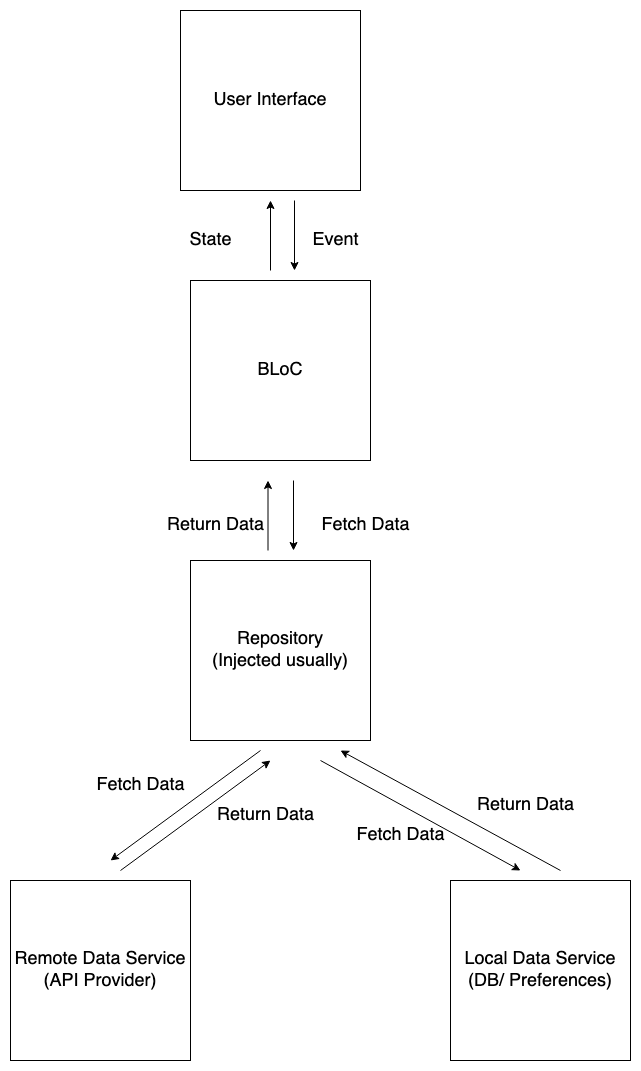
1. The app uses the BLoC package to manage the state of the app.
2. The BLoC receives events from the UI and sends requests to the repository.
3. The repository is responsible for getting data from the network or database.
4. The BLoC then updates the state of the app based on the data that it receives from the repository.
5. The updated state is then reflected in the UI.
The Injectable Repository Pattern is an architectural approach that separates data retrieval and manipulation from the business logic. It employs dependency injection to provide the necessary data sources (e.g., API calls, databases) to your BLoCs. This pattern enhances testability, maintainability, and scalability.
Key Components of Injectable Repository Pattern
- Repository: Acts as an intermediary layer between your BLoCs and data sources, abstracting the data retrieval and storage logic.
- Data Sources: Interfaces or classes responsible for interacting with external data, such as APIs, databases, or shared preferences.
- Dependency Injection: A technique that provides the necessary dependencies (e.g., repositories) to your BLoCs.
Integrating BLoC with Injectable Repository Pattern
-
Create Repositories: Define repositories that abstract data access. These repositories should handle interactions with data sources (e.g., REST API, local database) and return data models to the BLoCs. Use ‘RepositoryProvider’ to inject repositories to BLoC
-
Configure Dependency Injection: Use the injectable package to set up dependency injection. Register your repositories and data sources, making them available for injection into BLoCs.
-
Implement BLoCs: Create BLoCs that utilize the injected repositories to fetch and manipulate data. The BLoCs emit different states based on the data retrieved and processed.
-
UI Integration: Connect your Flutter UI components to the BLoCs. Use Flutter’s BlocProvider to manage BLoCs and streamline data flow between BLoCs and UI components.
Example
Below is a sample AuthenticationRepository code. The AuthenticationRepository exposes a Stream of AuthenticationStatus updates which will be used to notify the application when a user signs in or out.
In addition, there are logIn and logOut methods which are stubbed for simplicity but can easily be extended to authenticate with any auth provider like FirebaseAuth for custom authentication provider.
import 'dart:async';

enum AuthenticationStatus { unknown, authenticated, unauthenticated }

class AuthenticationRepository {
  final _controller = StreamController<AuthenticationStatus>();

  Stream<AuthenticationStatus> get status async* {
    await Future<void>.delayed(const Duration(seconds: 1));
    yield AuthenticationStatus.unauthenticated;
    yield* _controller.stream;
  }

  Future<void> logIn({
    required String username,
    required String password,
  }) async {
    await Future.delayed(
      const Duration(milliseconds: 300),
      () => _controller.add(AuthenticationStatus.authenticated),
    );
  }

  void logOut() {
    _controller.add(AuthenticationStatus.unauthenticated);
  }

  void dispose() => _controller.close();
}
You can look into simple example from blocklibrary website. Managing login and routing user to home page using repository pattern is explained in the link
Source code is available in link
Testing
1) Install the bloc_test package:
flutter pub add bloc_test
2) Create a new test file for your BLoC:
flutter test my_bloc_test.dart
3) Import the bloc_test package:
import 'package:bloc_test/bloc_test.dart';
4) Create a blocTest function:
blocTest('Test For Login', () {
  // Create a new instance of your BLoC.
  final bloc = AuthenticationBloc();

  // Add some events to the BLoC.
  bloc.add(AuthenticationEventLogin());

  // Assert that the BLoC emits the expected states.
  expect(bloc.state, AuthenticationStateSuccess());

});
5) Run the tests:
flutter test my_bloc_test.dart
Benefits of this Approach
Enhanced Separation of Concerns
By separating data retrieval and manipulation logic into repositories and BLoCs, you achieve a clean separation of concerns, making your codebase more modular and maintainable.
Testability
With the Injectable Repository Pattern and BLoC, you can easily write unit tests for your business logic and data access layers, ensuring code reliability and quality.
Scalability
As your app grows, this architecture scales gracefully. You can add new features, data sources, and BLoCs without causing excessive code coupling.
19 May 2022
•
devops
Solved - Fixing Dynamic linker error, dyld: Library not loaded issue in Xcode
If you get the below error while building in Xcode
dyld[596]: Library not loaded: @rpath/SomeFramework.framework/Core
  Referenced from: /private/var/containers/Bundle/Application/ABBB12A-A11E-4824-9A8E-66296BEBC700/MyApp.app/Frameworks/SomeFramework.framework/SomeFramework
  Reason: tried: '/private/var/containers/Bundle/Application/ABBB512A-A11E-4824-9A8E-66296BEBC700/MyApp.app/Frameworks/SomeFramework.framework/Core
Its generally a Xcode linking time error. Sometimes it may work fine in simulator but may fail in device. In all those cases, try debugging each step at once, and see if it resolves
    1. "Build Settings" > "Build Options" > "Always Embed Swift Standard Libraries" to "YES".
    2. "Build Settings" > "Swift Compiler - Search Path" > "Import Paths" to $(PROJECT_DIR) (recursive)
    3. "Build Settings" > "Linking" > "Runpath Search Paths" to @rpath or @executable_path/Frameworks
    4. "Settings" > "General" > "Frameworks, Libraries, and Embedded Content" and add the framework
    5. "Settings" > "Build Phases" > "Embed Frameworks" and add the framework (both Embed with/without signing)
    6. "Settings" > "Build Phases" > "Link Binary With Libraries" and add the framework.
    7. "Settings" > "Build Settings" > "Dynamic Library Install Name Base" to "@rpath"
For every step you should do
1. Product -> Clean Build Folder.
2. Deleting DerivedData.
If above still doesn’t work , you could be facing file referencing issue. In such cases
You could do Xcode -> Product -> Build For Running and then go to your app’s derived data folder -> Build -> Products -> Debug-iPhone OS -> Look if your framework and its dsym file are there.
You could also build an ipa -> show package contents -> frameworks -> Look if your framework and its dsym file are there.
If its missing then you can look into properly adding it to your workspace, preferrably select copy files while adding your framework.
17 May 2022
•
devops
If you get the below error following Azure/Microsoft documentation on authenticating keys with ssh
Error - Key must be Base64 encoded with OpenSSH format and RSA type. Valid keys will start with ssh-rsa
Follow the below steps to quickly generate ssh key
ssh-keygen -C "email" -t rsa
You can hit enter for all the prompts or customize by providing new keyname and location.
Once you get a randomart image, like below
+---[RSA 3072]----+
|                 |
|    .            |
|   E .  .        |
|  . -  . .       |
|++oo    S        |
|@=oo. o..        |
|*B=. =.=         |
|B*+o o* =.       |
|%=+=*o.+o        |
+----[SHA256]-----+
Type the below command in terminal
It will look something like this
ssh-rsa AAAAC1yc2EAAAADAQABAAABgQDK5XiisCX6QGrgI/5oDEANbqR05iDz9DH10d//iWOCYbPd0UTUUhhO5zQKxa4das565Y7qOByq5xOHBea+KSUeIpwsqBBQm0J9uWj3+D4DoALXalhPKMYl5fRthUVdqUelmaLkCVdPv+JnDl7RSVqlsaJYjVkLiB450/hpGBx8pmci5QWBuY0nDxZCIZCQwTZpZkJKQTF8kRQbV1fj35CohbSUmF/vQ7N/P++xiTExfktbRnXnuuBZ41XeoBFiYryo4i47y0hPaZAF69tmIMS8vcqfMi0MJWB0NJh4AoGbFfYyoo96UyT42cN9ZdlELqG/FNltzUKBMrjyVMCZLlh99m0+OWue+wGlmzrSrqx5fY5VmrECw/z0uVKDvy17jK/P3etrjKUwJbh48+4A0m73bB7dDH2fHwLGy69710UAlOsisfN7r7BvQh53Z3uZDFZeZgiNztVe6WpdTDDKjEFF0lVXIdAGHWj28Aoh77naKEUSKsKS/rFXzj/a0= email
Final steps
- Copy similar content from your terminal
- Go to User Settings in azure devops
- Go to ssh public keys
- Click Add
- Paste your public key there
- Now clone your repo. It should work!
19 Apr 2022
•
android
Date Picker in Android jetpack compose
Android jetpack compose as of today(April 2022) is still awaiting a native solution for date/time picker.
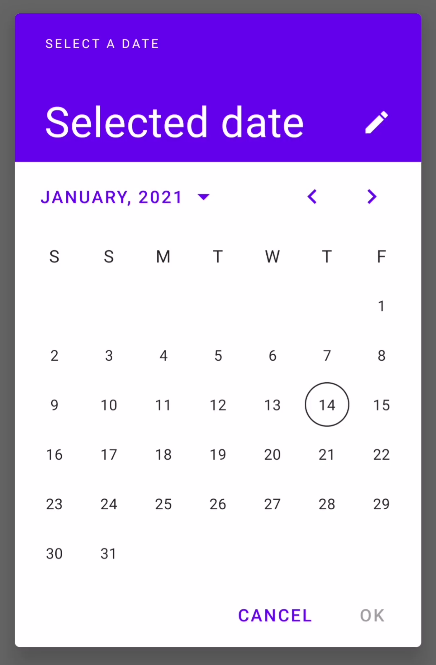
The workaround is to use material date picker or in built date/time picker dialogs on click of a button in jetpack compose.
1. Using com.google.android.material.datepicker.MaterialDatePicker
private fun showDatePicker() {
    val picker = MaterialDatePicker.Builder.datePicker().build()
    activity?.let {
        picker.show(it.supportFragmentManager, picker.toString())
        picker.addOnPositiveButtonClickListener {

        }
    }
}
2. Using third party library
There is also an option to include an open source date picker library from Vanpara - Github
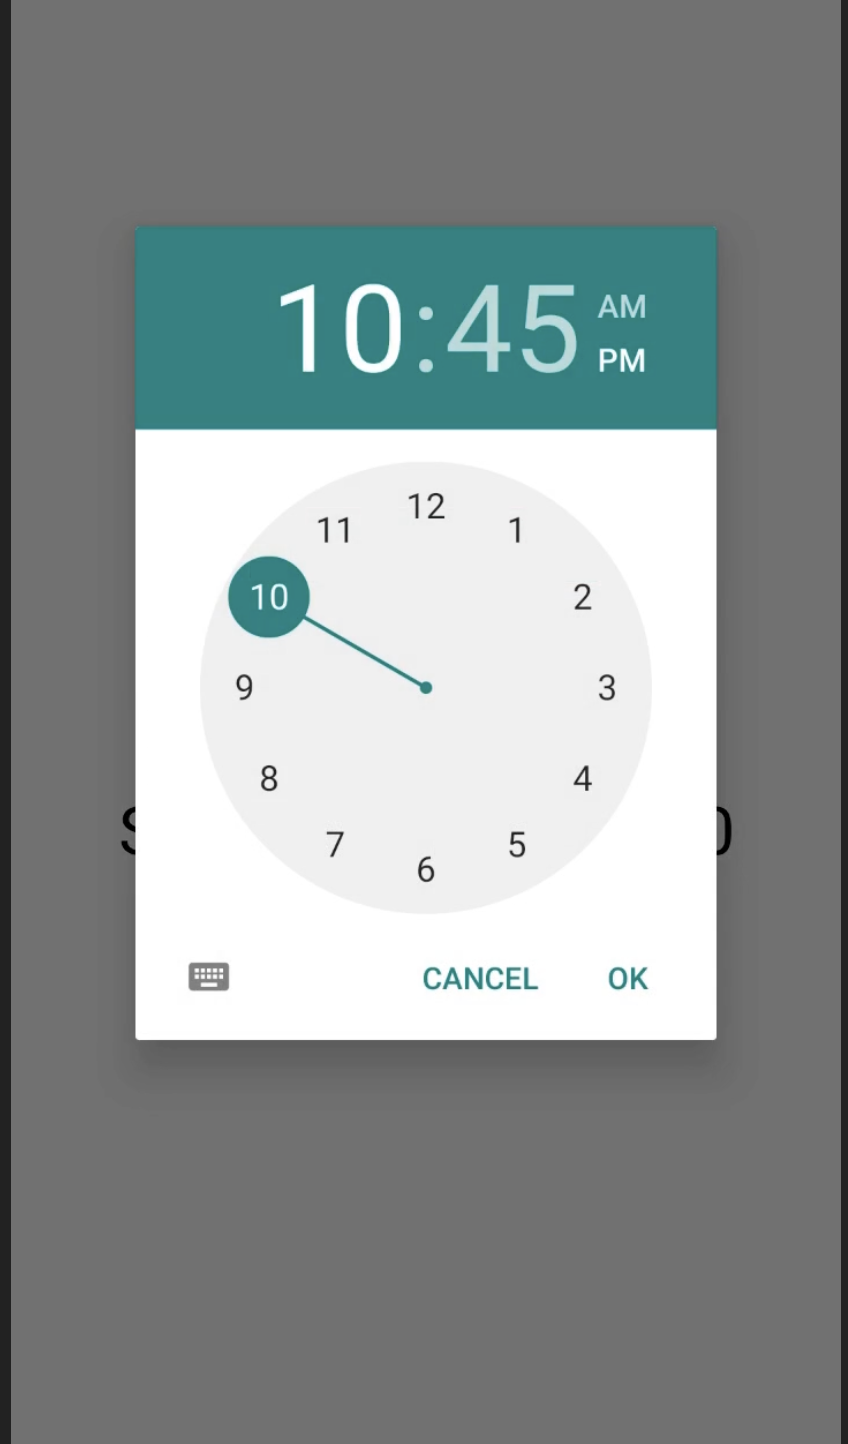
3. Using android.app.TimePickerDialog.
This is another option via android.app.TimePickerDialog. Again logic is to invoke via a jetpack event like button click
@Composable
fun MainContent() {
    Scaffold(
        topBar = { TopAppBar(title = { Text("Time Picker", color = Color.White) }},
        content = { MyContent() }
    )
}

// Creating a composable function
// to create a Time Picker
// Calling this function as content
// in the above function
@Composable
fun MyContent(){

    // Fetching local context
    val mContext = LocalContext.current

    // Declaring and initializing a calendar
    val mCalendar = Calendar.getInstance()
    val mHour = mCalendar[Calendar.HOUR_OF_DAY]
    val mMinute = mCalendar[Calendar.MINUTE]

    // Value for storing time as a string
    val mTime = remember { mutableStateOf("") }

    // Creating a TimePicker dialod
    val mTimePickerDialog = TimePickerDialog(
        mContext,
        {_, mHour : Int, mMinute: Int ->
            mTime.value = "$mHour:$mMinute"
        }, mHour, mMinute, false
    )

    Column(modifier = Modifier.fillMaxSize(), verticalArrangement = Arrangement.Center, horizontalAlignment = Alignment.CenterHorizontally) {

        // On button click, TimePicker is
        // displayed, user can select a time
        Button(onClick = { mTimePickerDialog.show() }, colors = ButtonDefaults.buttonColors(backgroundColor = Color(0X006600))) {
            Text(text = "Open Time Picker", color = Color.White)
        }

        // Add a spacer of 100dp
        Spacer(modifier = Modifier.size(100.dp))

        // Display selected time
        Text(text = "Selected Time: ${mTime.value}", fontSize = 30.sp)
    }
}